
")

Recently I had to whip up some renderings for a client who sells alcohol-fuel fires, eco-stoves, eco-heaters, call them what you will; they amount to a surround of some kind and a spirit burner that uses ethanol as a fuel.
The fire and smoke simulator in Blender is a lovely piece of work, but it is more geared toward larger, more natural fires than what I needed. The flame I had to simulate burns slow and cool from a narrow slot and rises to about 15-20cm. It is also quite cohesive, that is few smooth flames with little turbulence.
Since it took me a while and several tutorials to work out how to do this, I thought I would share my recipe in the hope that someone else finds it useful.
The following is based on Blender v2.69 on Gentoo Linux and starts from the factory defaults. Any value not mentioned has been left at default. As fire is a fluid simulation the various measurements given must be used as is to obtain the result shown; even slight changes can have a marked effect on the outcome.
- So, open Blender and make sure you are using 'Blender Render' as this doesn't (yet) work in Cycles. Next remove the default cube and the light and set the system units to your preferred system (I use metres). This step may or may not be necessary, but sometimes the effects achieved can vary with size, so I do everything in one coordinate scale to keep things even.
- Take the cube at the origin and scale it to x,y,z 5.283cm, 52cm, 5.09cm and name it Firebox - this will be our collision object that contains the initial exuberance of the simulation. Position it at x,y,z 4.92555mm, 0m, 8.25009cm. We need to cut two slots in the top of the firebox to let the flames out; in edit mode place 4 Loop cuts at y = -23cm, -1.5cm, 1.5cm and 23cm in Global coordinates. Place two more Loop cuts at x = -3.58044cm and -5.65554mm respectively and remove the two faces in the middle of the top, leaving a bar in the centre.
- Now add a plane at the origin and scale it to x,y,z 2cm, 48cm, 0cm and name it Emitter - this is where our flames will originate.
- Select the Emitter, press SPACEBAR and type in 'quick' then select 'Quick Smoke'. This will add a Smoke Domain object to your scene and set up the Emitter as the emitter. Now scale the Smoke Domain to x,y,z = 10cm, 60cm, 38cm and position it at z = -16.5cm.
If you run the simulation at this point you will see that the Smoke domain fills with a dense black smoke that stops about 1.1cm from the boundaries of the Smoke Domain. This distance seems to vary with the size of the domain and appears to be the minimum distance that one part of the simulation can be from another for it to work properly. In fact, if we now select the Firebox and make it into a collision object by going to the Physics panel and selecting Smoke, then Collision, running the simulation fails because the smoke remains trapped in the Firebox - it is too dense to escape. We shall resolve this in the next step:
- Select the Smoke Domain and in the Physics panel set Smoke->Resolution->Divisions to 72, Time->Scale to 0.6, Vorticity to 3.0, tick Dissolve and set Time to 12.
- Set Smoke Flames->Reaction->Speed to 0.53906.
- Tick Smoke Adaptive Domain and Smoke High Resolution.
- Select the Emitter and in the Physics panel set Smoke->Flow Type to Fire.
- Set Flow Source->Surface to 1.1 and Flame Rate to 2.97.
Now run the simulation again and voilà... nothing has changed except the smoke has become fire and it is still trapped within the Firebox. Select the Smoke Domain again and move it up by 1mm and run the simulation. Now we have flames! In fact we can roughly control the height of the flames by moving the Smoke Domain vertically between 1mm and 21.5mm.
At this point we have finished with the physics part of the simulation and can bake it to save us some time on the next steps. Select the Smoke Domain and in the Physics panel click on Smoke Cache->Bake. When it has finished run the timeline and select a suitable frame to render; I used frame 158. It would also be a good plan to save your file.
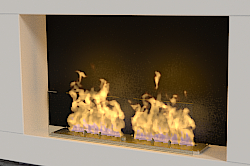
Make sure that your Smoke Domain is selected and select a suitable frame from your cached simulation. Now let's render our flames... Wow! That's ugly.
It turns out that there's a very important setting in the Material panel which dramatically affects the quality of our render. Select the Smoke Domain and go to the Material Panel->Integration->Step Size. It is currently set to 0.100, which is a reasonable default; unfortunately, we have increased the resolution of our domain from 32 to 72 so the sampling is not enough. Set it to 0.001 and render your scene again and you will see a vast improvement.
To speed up your rendering, which you will have noticed has slowed down due to the decreased step size, you can disable anti-aliasing in the Render panel.
The colour of our flame is not very accurate - it looks bigger tan it is and as if it were a wood fire or something similar. Not to worry, the next bit will fix that.
- In the World panel, set World->Horizon Color to black,
- With the Smoke Domain still selected, open the Textures panel where you will see two predefined textures: Smoke Density and Flame. We don't need Smoke Density so you can untick it. (Unless you're trying to simulate smokey paraffin)
- Now look at the Colors drop-down; you will see a ramp of red, yellow and white that produces the colours in the flame we just rendered. We are going to create our own colour ramp using the values in the following table:
| Position | Red | Green | Blue | Alpha |
| 0.000 | 0 | 0 | 0 | 0 |
| 0.026 | 0.100 | 0.015 | 0 | 0 |
| 0.160 | 0.200 | 0.030 | 0 | 0.215 |
| 0.227 | 0.700 | 0.400 | 0.100 | 0.331 |
| 0.451 | 0.700 | 0.400 | 0.100 | 0.331 |
| 0.572 | 0 | 0.100 | 1.00 | 0.300 |
| 1.000 | 0 | 0 | 1.000 | 0 |
- These values will produce a nice blue base to the flame. The reason that the blue is so far up the ramp is that a lot of the flame is contained inside the Firebox. On rendering you will see that we now have the right colours, but that the flame looks dull.
- In the Influence drop-down set Emission to 20 and Emission Color to 5. Now the flame is incandescent.
{jcomments off}